深度学习框架 TNN Proto 字段解析
date
Dec 6, 2021
slug
tnn_proto_parse
status
Published
tags
learning
coding
type
Post
outer_link
summary
介绍腾讯深度学习推理框架 TNN 模型文件 tnnproto 的各字段含义
TNN 是我所在的腾讯优图实验室开发的深度学习推理框架, 支持 ARM, X86, CUDA 等多种后端. 作为算法一枚, 本人于 2020 年就开始在内部业务上尝试将 TNN 用到 X86 服务器上做模型部署, 这一年多时间里和开发组打了不少交道也反馈了不少 bug, 眼看着 TNN 从早期的不成熟、遍地是坑一步步发展得越来越好. 然而 TNN 相关文档是极其匮乏的, 这一点上做的确实令人不满意. 今天这里就要分享下 TNN 模型的 Proto 文件中各字段都是什么意思, 方便有需要的人.
本文主要包含两部分: (1) 源码梳理: 顺着 TNN 源码, 一步步讲清楚 TNN proto 解析的流程; (2) 直接上 proto 文件解析的结论, 不想看 (1) 可以直接跳到 (2)
1. 源码梳理
TNN GitHub 仓库中, Proto 解析部分的源码在 source/tnn/interpreter 目录, 该目录组织结构如下图:
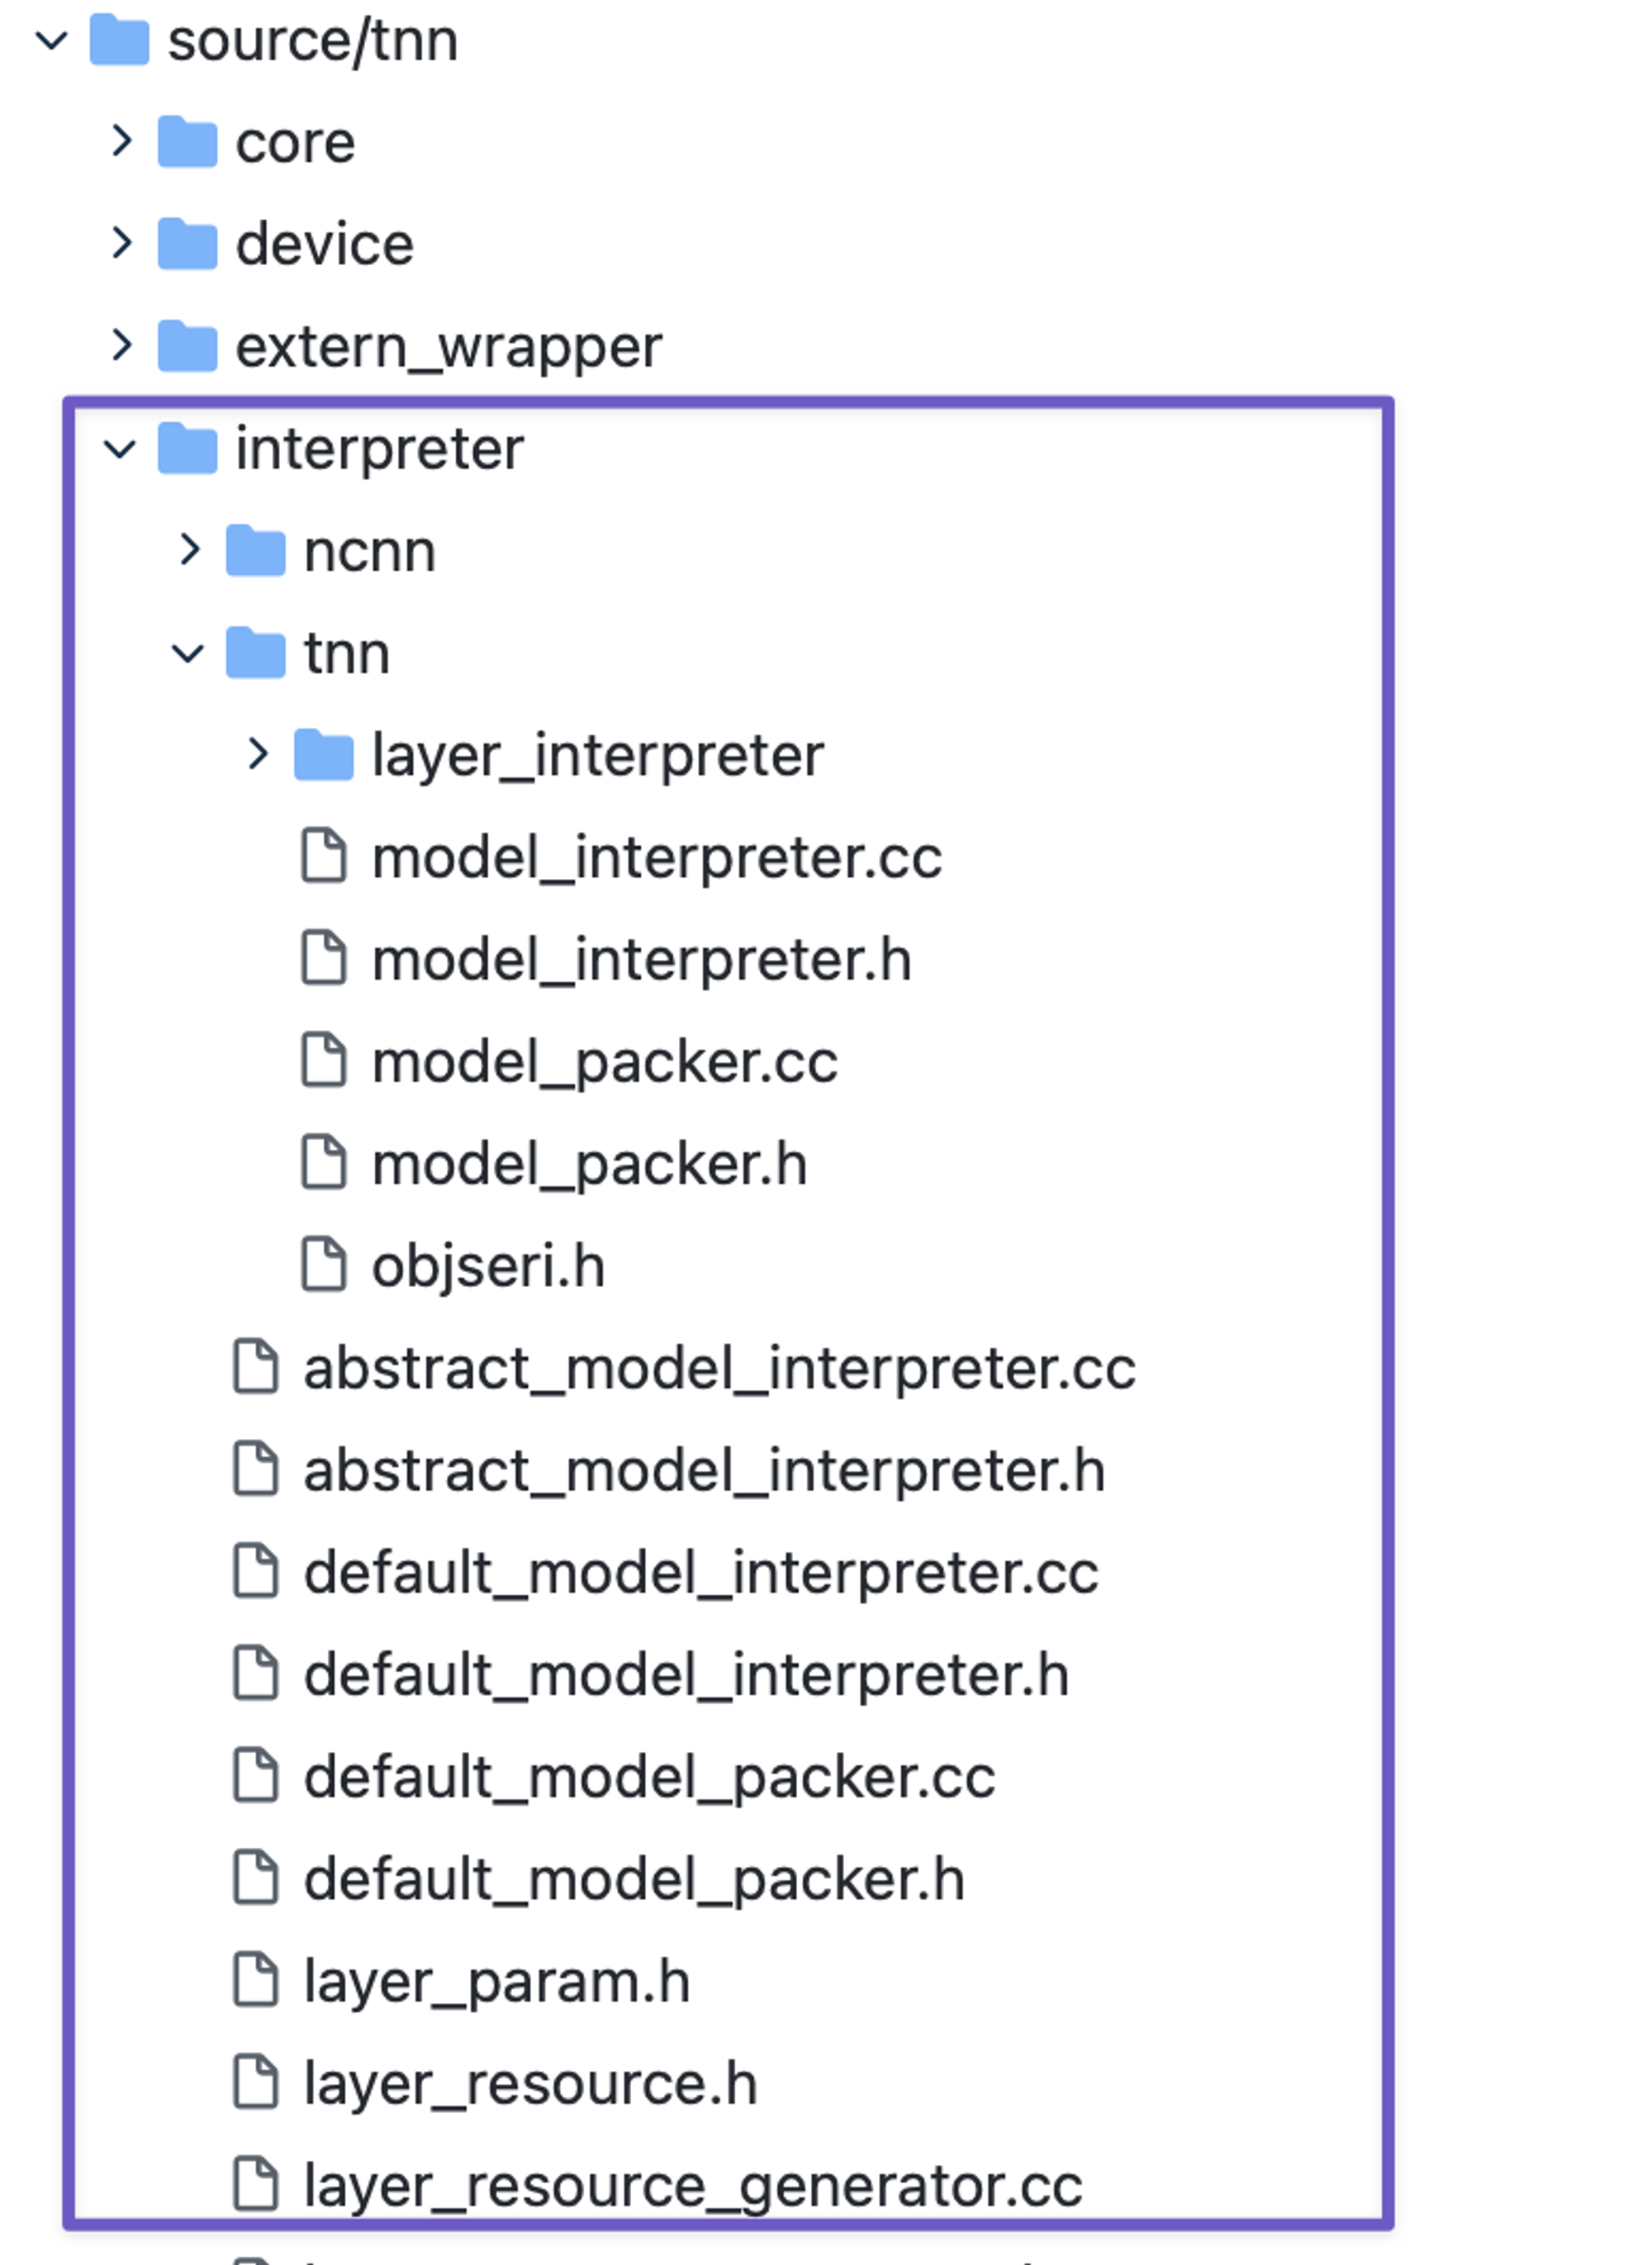
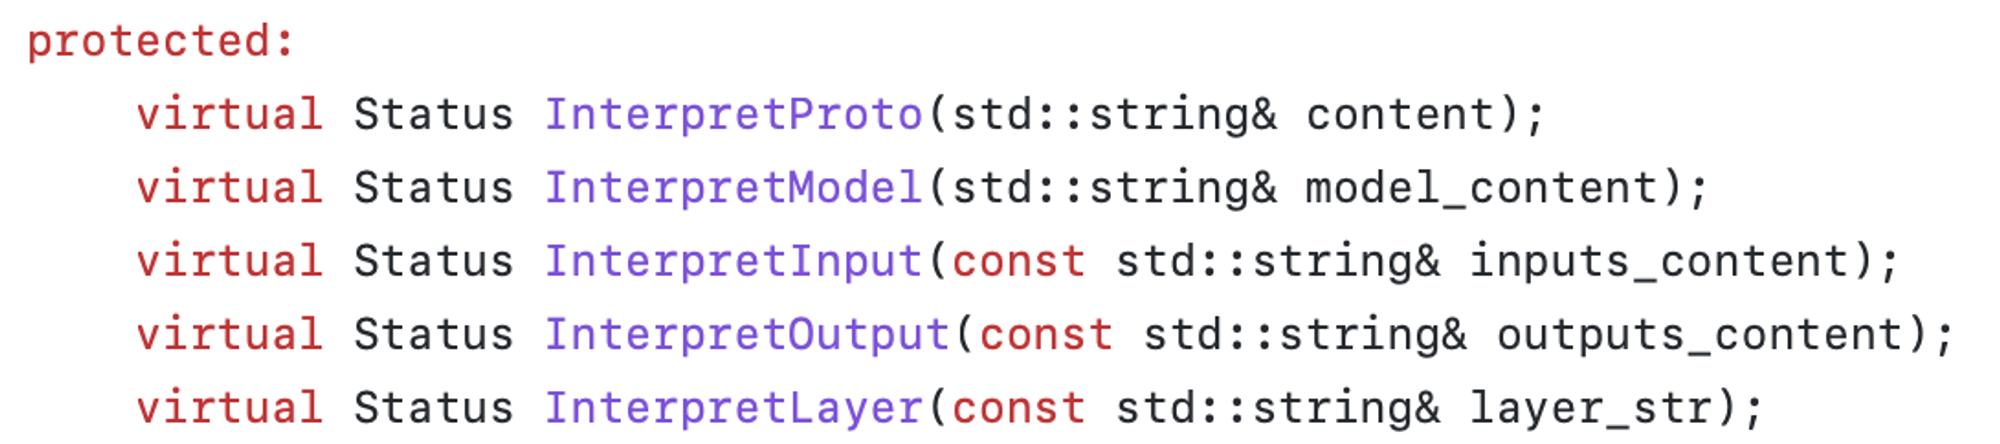
model_interpreter.h 中定义了 proto 文件的顶层接口, 基类 ModelInterpreter 中定义了 5 个函数, 主要负责处理解析 proto 文件的字符串工作, 比如划分输入、网络层和输出部分等.
layer_interpreter 文件夹中定义了具体的各种 Layer 的解析代码, 如 conv, pool 等:

我们拿 resnet18 的 tnn proto 为例梳理整个的 proto 解析流程:
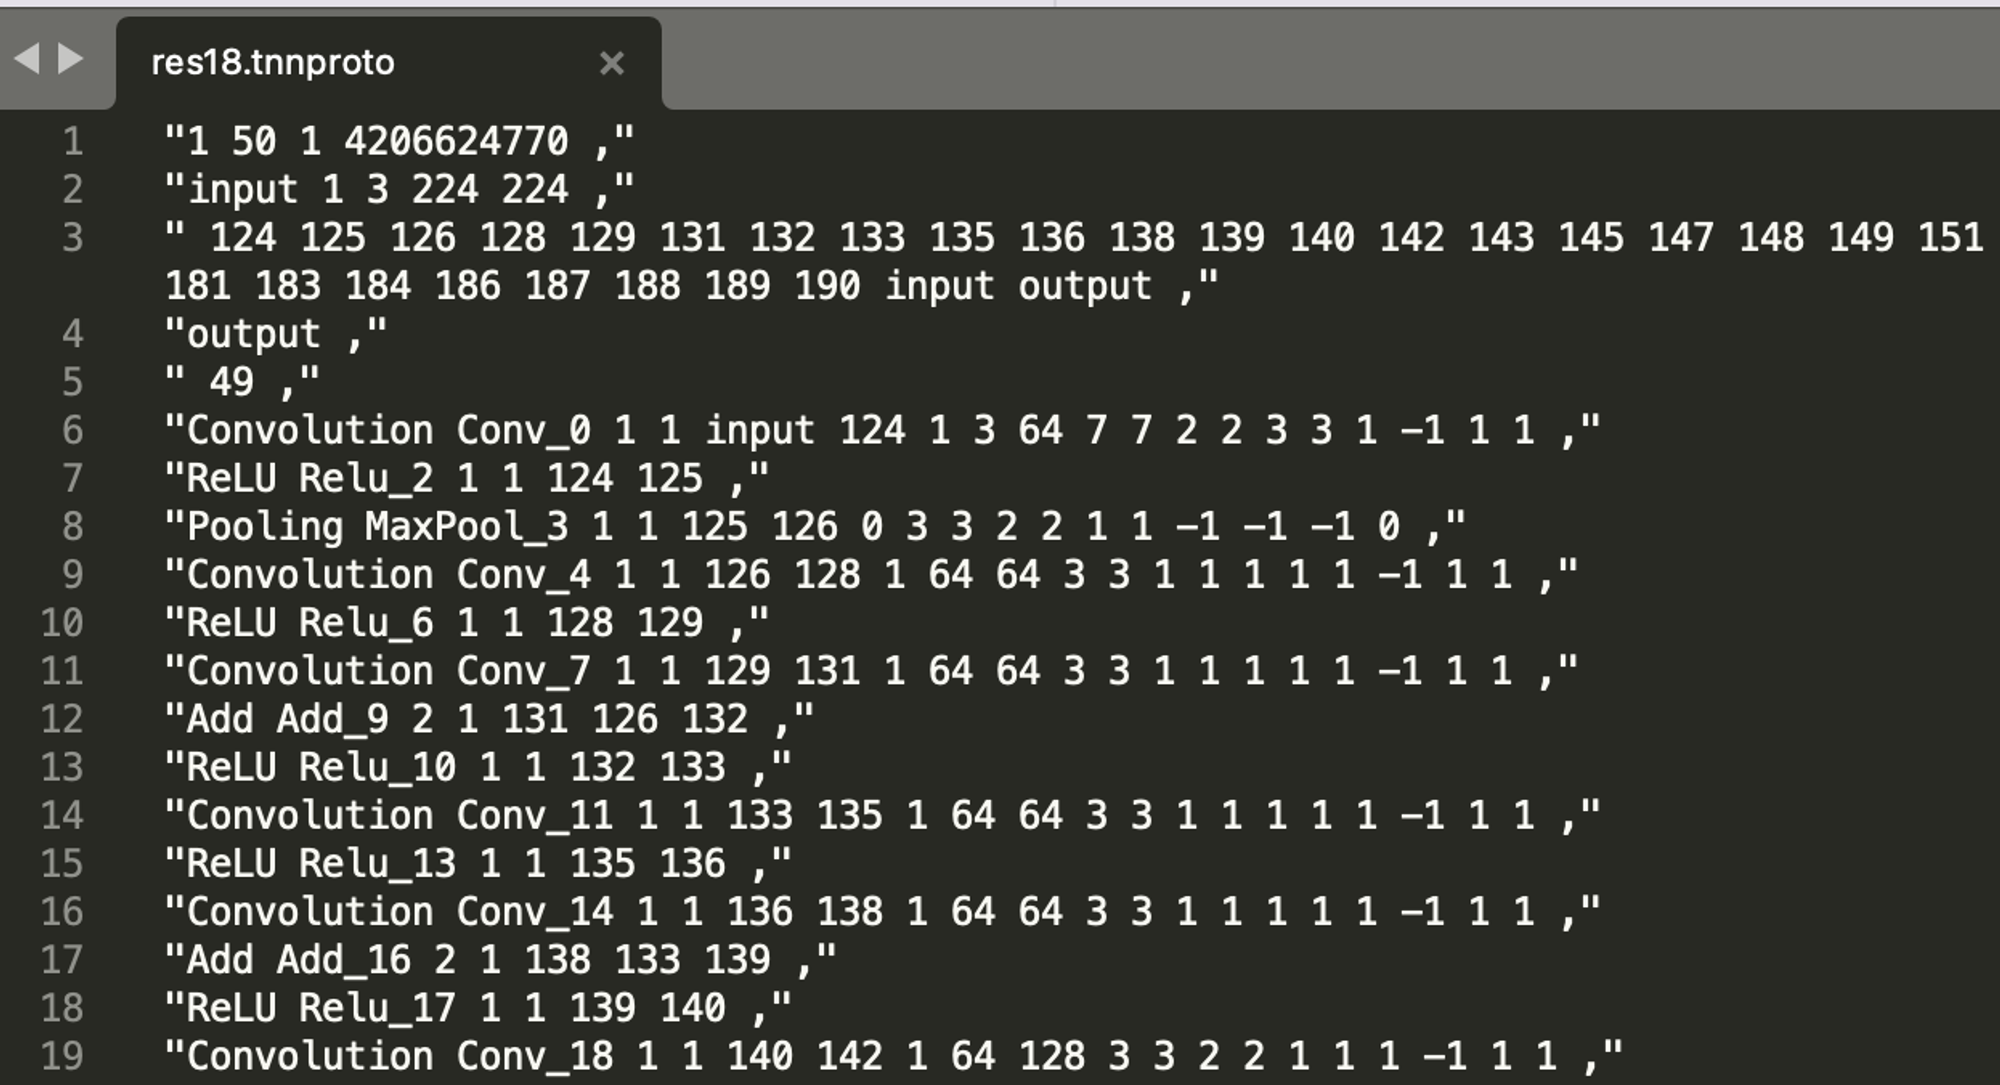
首先调用 ModelInterpreter::InterpretProto(string&) 函数解析以上 proto 文件, 一行一行读取, 每行剔除首位的引号, 逗号以及多余的空格后, 保存到名为 cfg_arr 的 vector<string> 中, 比如上面 proto 文件一共 248 行, 那么 cfg_arr.size( ) == 248, cfg_arr[0] == "1 50 1 4206624770".
接下来就是遍历 cfg_arr 中每一行的字符串, 去逐个解析了, 核心逻辑如下:

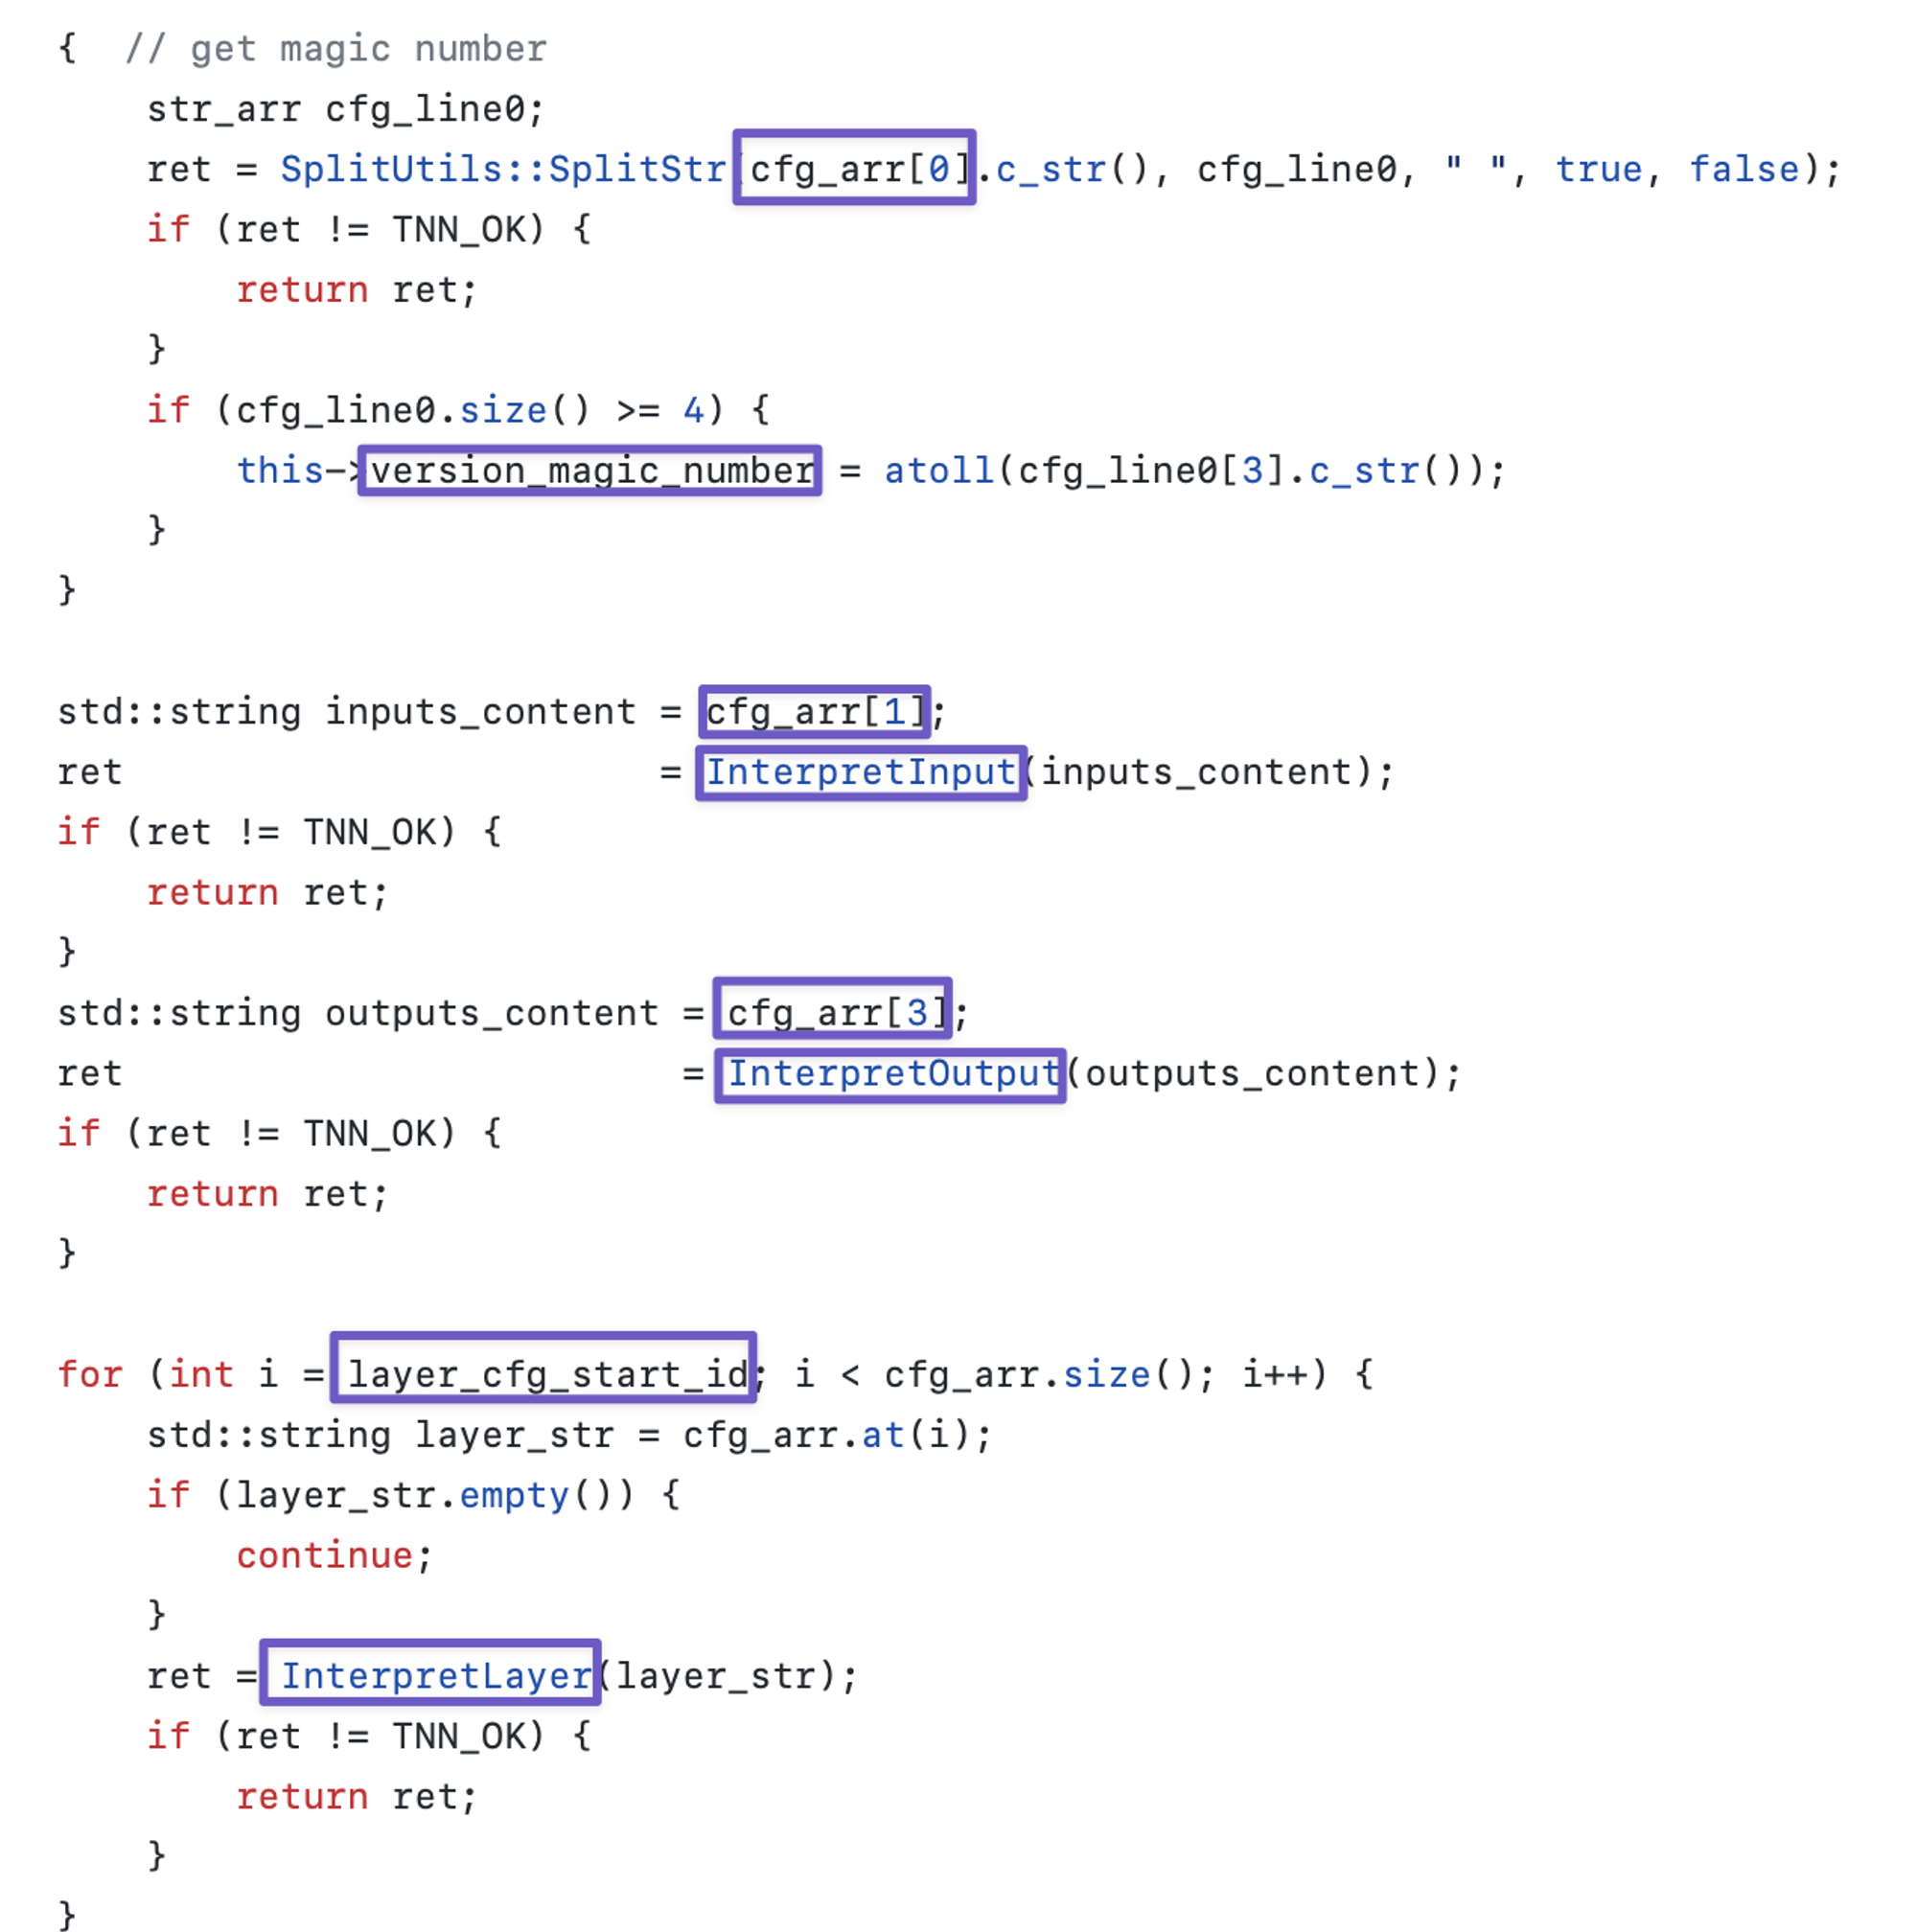
这段代码中交代了, 版本号 magic_number, input, output 和具体的网络层 Layer 的解析工作.
第 1 行 4 个数中, 似乎只有第 4 个数有用, 是描述 tnn model 版本号的 magic_number.
第 2 行是模型输入节点的描述, 依次是 input_node_name 和 input_shape.
第 4 行是 output_node_name.
接下来从第 6 行开始 (layer_cfg_start_id) 正式进入每个 Layer 的解析, 也就是调用 ModelInterpreter::InterpretLayer(string &) 函数.
在 ModelInterpreter::InterpretLayer(string &) 中, 输入为上述 cfg_arr 中每行对应的字符串, 如第 6 行为 “Convolution Conv_0 1 1 input 124 1 3 64 7 7 2 2 3 3 1 -1 1 1”. 接着再使用空格为分隔符对其进行拆分, 得到 vector<string> layer_cfg_arr, 如第 6 行的 layer_cfg_arr 为 {"Convolution", "Conv_0", "1", "1", "input", "124", "1", "3", "64", "7", "7", "2", "2", "3", "3", "1", "-1", "1", "1"}.
这时, 常量 layer_param_start_id 就派上用场了, layer_param_start_id = 4 意思是 layer_cfg_arr 中第 5 个参数开始为 Layer 的参数描述, 那么前 4 个参数的意思分别是: LayerType, LayerName, input_count, output_count. 所以, 上述 layer_cfg_arr 的意思是, 这是一个 Convolution 层, 名字叫 Conv_0, 输入和输出都只有一个节点. 接下来, 紧跟着 input_count(此处为1) 个为 input_nodes, output_count(此处为1) 个为 output_nodes. 也就是 Conv_0 的输入为 Input 节点, 输出为 "124" 节点.
最后我们把 layer_cfg_arr 中从 layer_param_start_id + input_count + output_count 之后开始的字符串数组截取出来, 解析真正的层参数. 这里, 源码中的调用方式是:

其中, out_end = layer_param_start_id + input_count + output_count. param 是一个 LayerParam 对象, 用于保存解析后的层参数. 这里的 InterpretProto 函数的具体实现, 就是在图 1 中 source/tnn/interpreter/tnn/layer_interpreter 下, 比如这里的 Convolution Layer 调用的就是 conv_layer_interpreter.cc 中的 ConvLayerInterpreter::InterpretProto 函数:

仍然以 {"Convolution", "Conv_0", "1", "1", "input", "124", "1", "3", "64", "7", "7", "2", "2", "3", "3", "1", "-1", "1", "1"} 这组 layer_cfg_arr 为例, start_index = 6 之后开始是层参数. 这里的 LayerParam 是类 ConvLayerParam 对象, 定义在source/tnn/interpreter/layer_param.h:
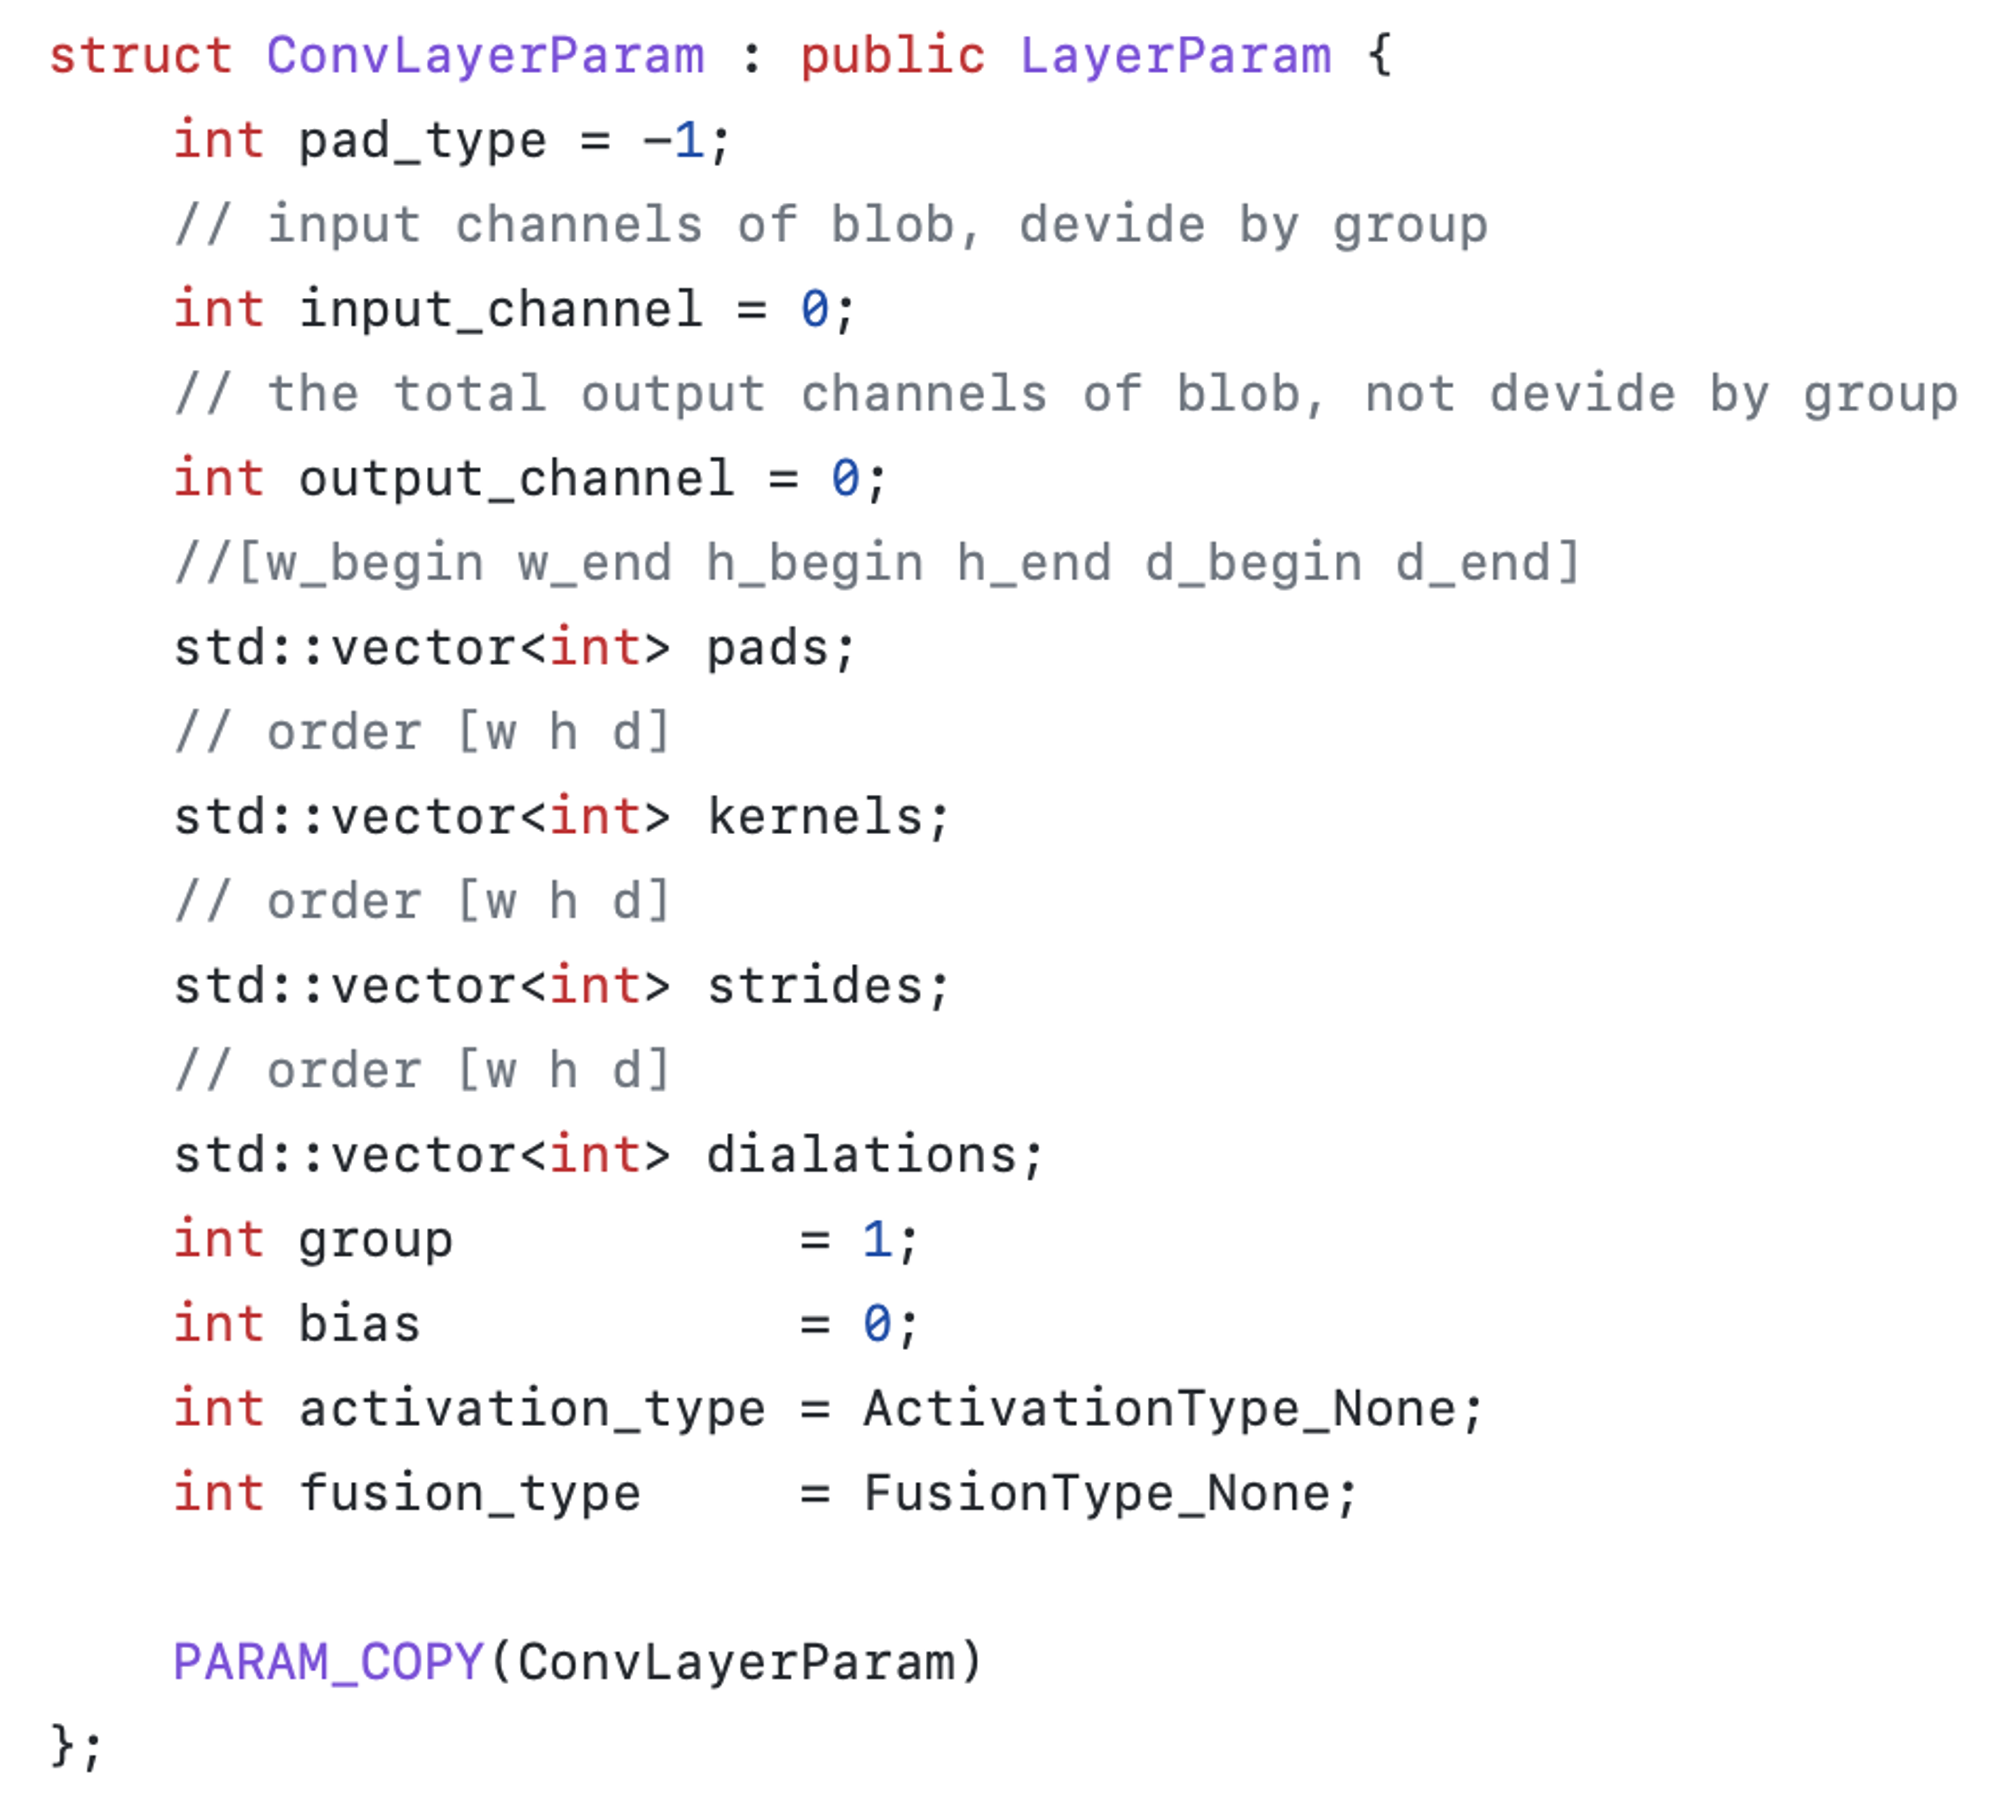
接下来的 3 个数 1, 3, 64 显然代表 group, input_channel, output_channel.
GET_INT_2_INTO_VEC_REVERSE 的意思接着往下读 2 个参数, 并反转顺序后赋值. 从 ConvLayerParam 中我们得知, kernels 为 [w, h] 顺序, 那么这里读进来第一个是 h, 第二个是 w. 也就是 7, 7 分别代表 kernel_h, kernel_w.
上述代码中, TNN 定义了一系列宏, 字面意思也很好理解. 它依赖于全局变量 index 指针的数值, 决定从 layer_cfg_arr 中哪里开始读区. 每调用一个宏, 往后移动一定位数. 如 GET_INT_3 读取 3 个参数, 读完以后 index += 3, 接着调用 GET_INT_2_INTO_VEC_REVERSE 读区 2 个参数, 以此类推. 这里宏的实现定义在 source/tnn/interpreter/tnn/layer_interpreter/layer_interpreter_macro.h
2. 结论
按照上文中的方法, 我们能轻松获取 Proto 文件中各种 Layer 的参数含义, 我整理了常用的一些 Layer Op 含义, 整理如下 (未覆盖到的可按照上述方法自行查阅源码分析):
第 1 行第 4 个字段是描述当前模型版本的 magic number
第 2 行描述 input(s) 的 name 和输入 shape
第 4 行描述 output(s) 的 name
第 6 行开始是每一层的 Layer 信息, 前 4 个值分别代表 LayerType, LayerName, input_count, output_count. input_count 和 output_count 代表这个 Layer 接收几个输入和产生几个输出, 因此后面接着 input_count 个参数是 input_node(s) 的 LayerName, 再接着 output_count 个参数是 output_node(s) 的 LayerName. 最后剩下的参数就是关键的 Layer 参数了:
1. Convolution (2D 卷积)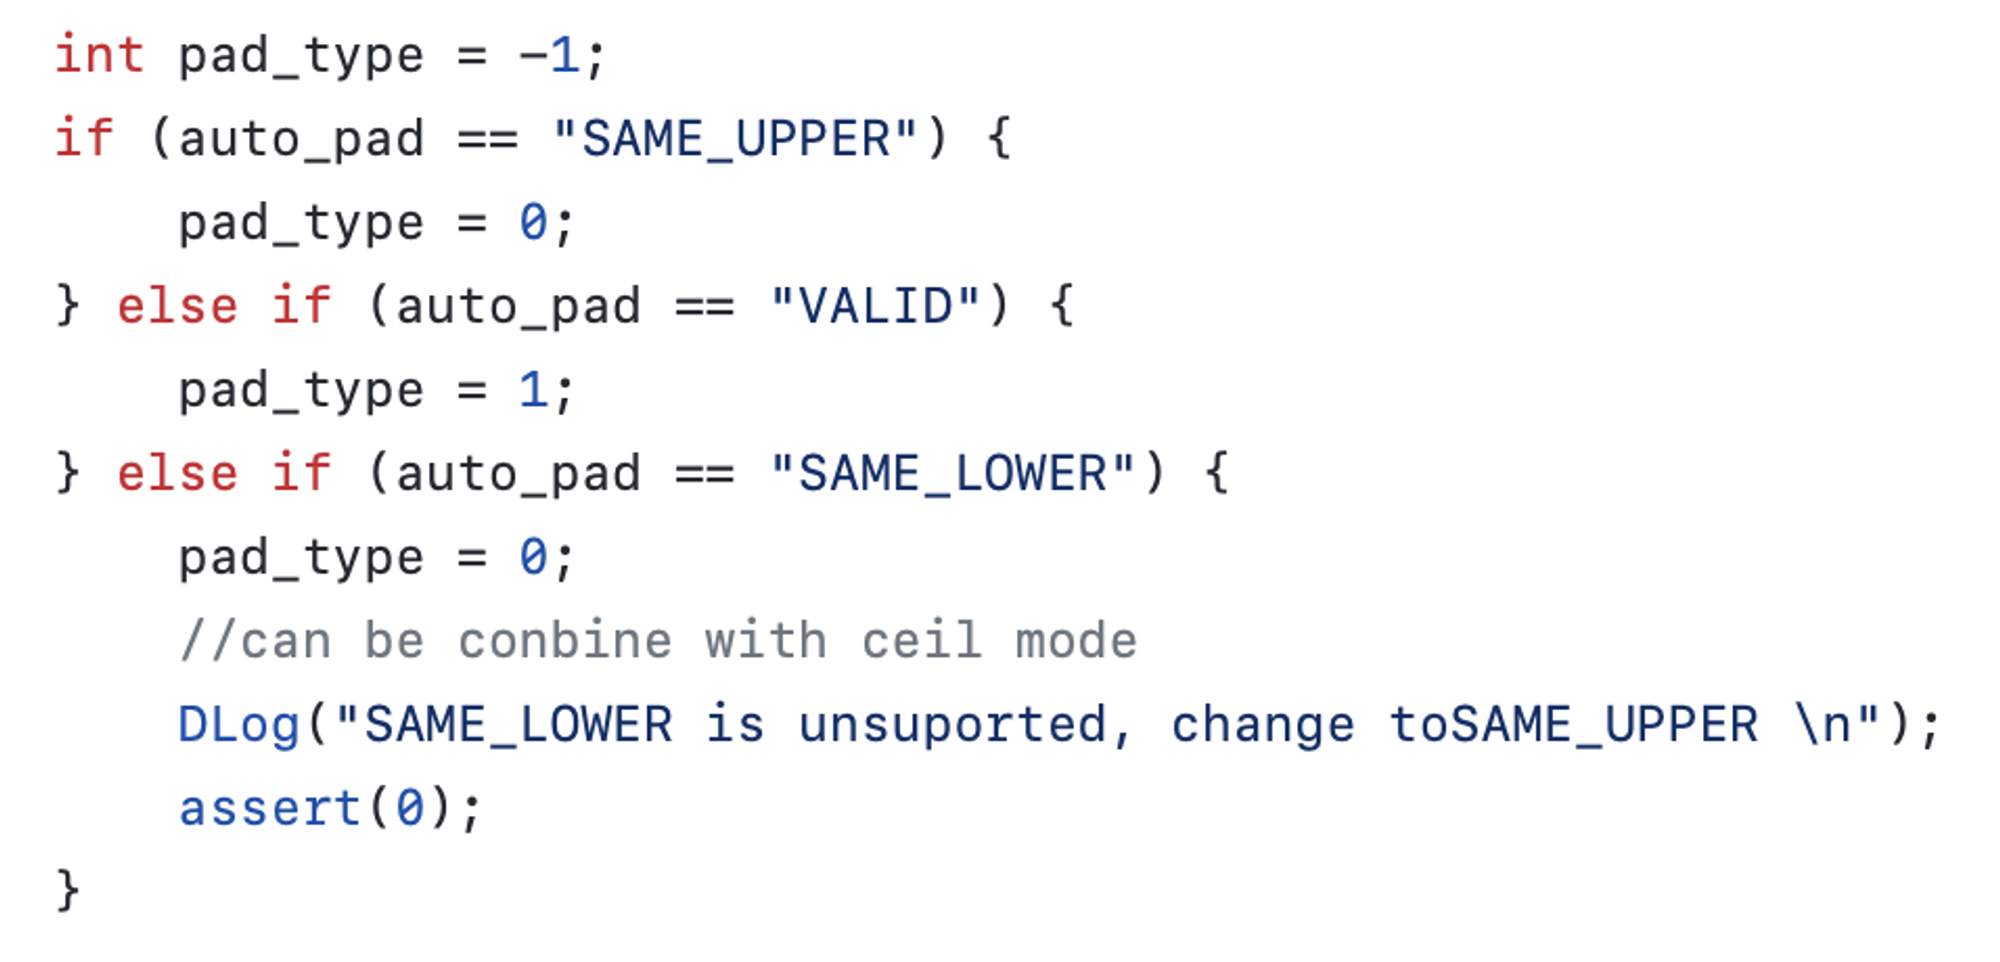
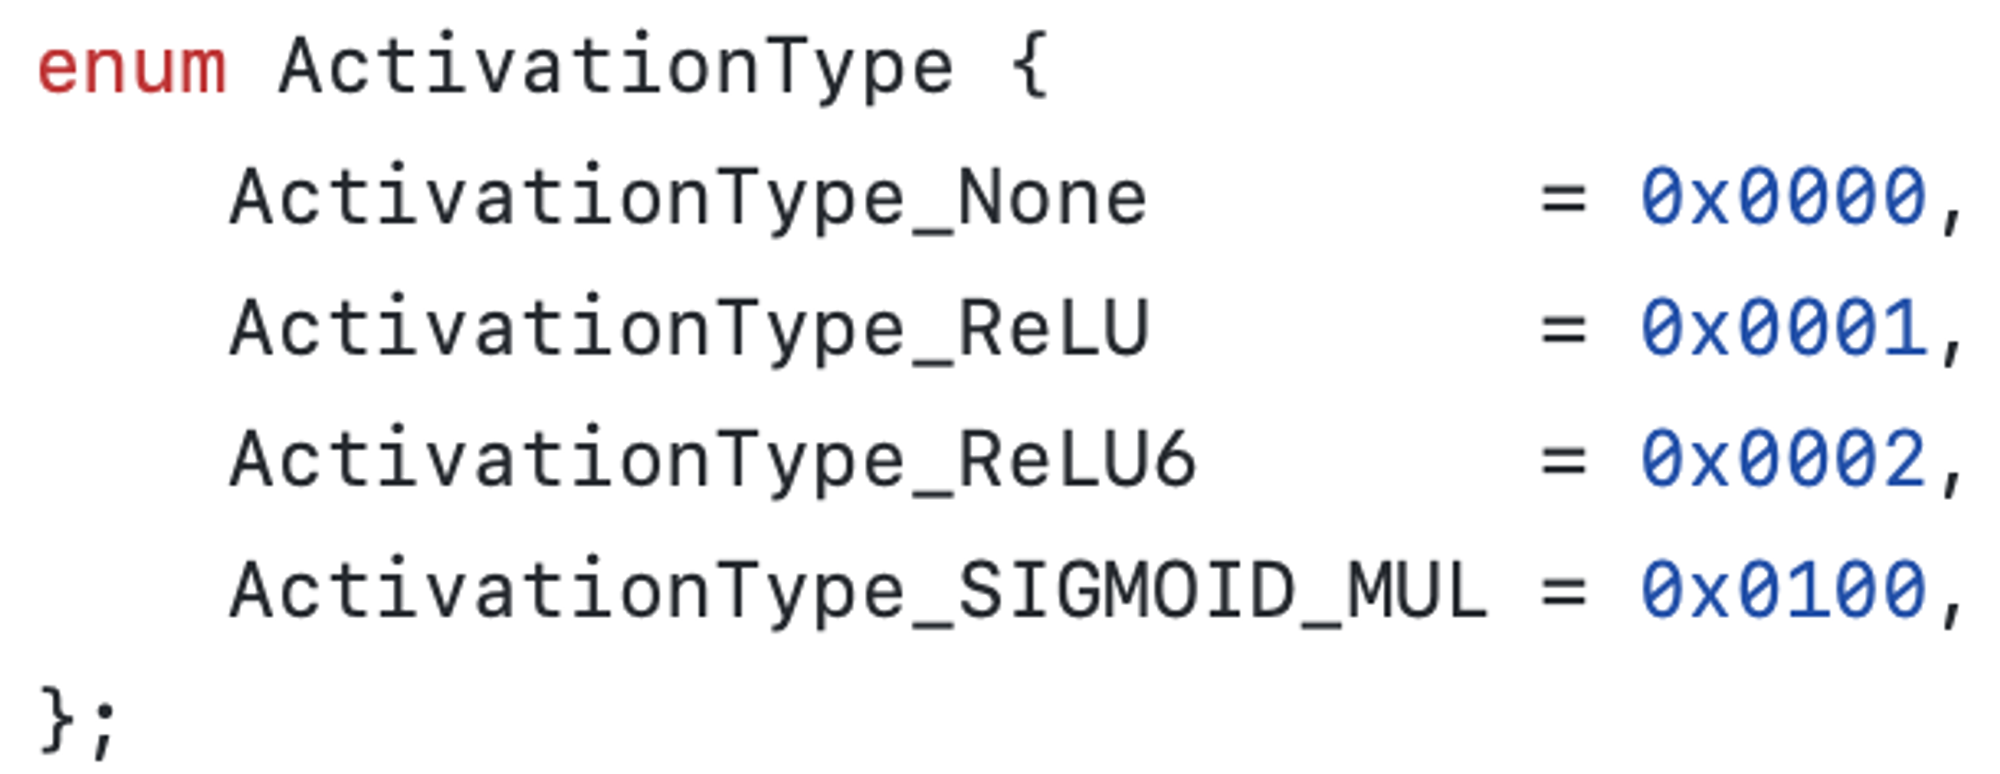
group, input_channel, output_channel, kernel_h, kernel_w, stride_h, stride_w, pad_h, pad_w, bias(默认1), pad_type (默认 -1), dialation_h, dialation_w, activation_type(默认 ActivationType_None)
pad_type 含义可在 tools/onnx2tnn/src/core/layer/onnx_converter_pool.cc 中找到:
activation_type:
2. Reshape
axis, num_axes, top_blob_dim_size, output_shape(往后读取 top_blob_dim_size 个参数), reshape_type
如果 top_blob_dim_size = -1, 报错 Error: ReshapeLayerInterpreter: invalid layer param
reshape_type: 0 是 nchw, 1 是 nhwc
3. Permute
order_size, orders(order_size 个参数)
4. SplitV
axis, slice_count, slices (slice_count 个参数)
slices: 每个 slice 的大小
5. Add、Sub、Mul、Div
weight_input_index
6. Pad
n1, n2, pad_top, pad_bottom, pad_left, pad_right, pad_channel_begin, pad_channel_end, type, value
n1, n2 两个参数暂时没用
type: 0:const 1:reflect 2:edge
type 不为 0 时在 channel 上 pad 是不支持的
7. Flatten
axis
8. Gather
axis, data_in_resource, indices_in_resource
9. InnerProduct
num_output, has_bias, transpose, axis
10. Pooling
pool_type, kernel_h, kernel_w, stride_h, stride_w, pad_h, pad_w, kernel_indexs_h, kernel_indexs_w, pad_type, ceil_mode, is_adaptive_pool, output_h, output_w
pool_type: 0: same, 1: valid
pad_type:
kernel_indexs 是给 adaptive pool 用的, 默认 -1
11. Softmax
axis
12. Upsample
mode, scale_h, scale_w, align_corners, height, width
mode: 1: nereast 2: bilinear/linear 3: cubic
另外, netron 这款模型可视化工具已经支持 TNN proto 的可视化解析了, 不过部分参数仍然不太正确. 遇到问题可以参考本文的方案自行解析.